 The Queen’s Bays, along with the 9th Queen’s Lancers, 10th Royal Hussars, 1st Battalion The Rifle Brigade and the 9th Battalion The King’s Own Yorkshire Light Infantry, were a part of the 2nd Armoured Brigade and subsequently a part of the 1st Armoured Division and X Corps, Eighth Army, stationed in North Africa in the Second World War.
The Regiment was divided up into five squadrons, ‘A’, ‘B’, ‘C’ and ‘D’ with a Head Quarters Squadron. Each squadron was then divided into Squadron HQ and four troops. Below is the Battle order for ‘C’ Squadron on 26 March, 1943:

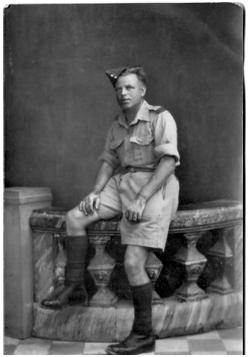 Trooper Ranson, shown in the picture, is my maternal grandfather.
In 1943 following the victory at El Alamein in 1942, the Eighth Army were pursuing the Axis forces across Northern Africa and on 13 March the Bays were halted four miles north of the little French pre-War garrison town of Medenine. A few miles away to the north east, the forward posts of XXX Corps were in contact with the Axis forces on the Mareth Line, and about the same distance to the east were the Matmata Mountains from where Rommel had led Panzer Divisions down onto the Medenine plain in an attempt to destroy the two leading divisions of the Eighth Army.
General Bernard Law Montgomery, had been planning for an attack on the Mareth Line since early 1943, the plan being finalised on 26 February, this plan was called OPERATION PUGILIST.
The plan was for XXX Corps with three divisions to penetrate the north-eastern end of the Mareth Line and then roll it up from the right. X Corps, with the 1st Armoured and 7th Armoured Divisions, was to pass through the Line and advance on Gabes and Sfax. The New Zealand Division with the 8th Armoured Brigade and the Free French were to move west of the Matmata Mountains and cut the enemy off from Gabes. The Bays were to provide the armour of a so-called ‘Route Task Force’, which was to clear four routes across the Mareth Line and form a bridgehead beyond for X Corps to pass through:
One squadron of Sherman tanks was to go under command of the Yorkshire Dragoons, who were to be responsible for the two routes in the right sector; the remainder of the Regiment with the 1st Field Squadron and one squadron of the Yorkshire Dragoons under command, to clear two routes on the left sector.
At 2300 on 20 March the infantry attack started with an artillery bombardment. Reports stated that the attack was going well and the ‘Route Task Force’ was organised into component parts and made ready to move. There was no move on the 21 March, nor the next day, until the afternoon when the Regiment was ordered to rejoin the 2nd Armoured Brigade.
With the disbanding of the ‘Route Task Force’ the original plan was abandoned as it was not possible to get tanks across the Wadi Zigzaou.
Following a heavy counter attack by the 15 Panzer Division and the 90 Light Division, OPERATION PUGILIST was abandoned, and it was decided that the 1st Armoured Division was to join the New Zealand Corps west of the Matmata Mountains. Orders were received by the Bays in the early hours of 23 March to move at once south east to Kilo10 on the Medenine-Ben Gardane Road, the tanks to be loaded on transporters.
By 1830 on 23 March loading of the tanks was completed and at 1930 the Regiment started a fifty-two mile a night march, twenty miles on transporters to Foum Tatahouine, and a further thirty-two on tracks.
At 0215 on the 24 March the Bays reached Foum Tatahouine and the tanks were unloaded, the move then continued north-west through Wilder’s Gap. The regiment rested for several hours at 0730. During this halt the Bays received fresh orders and the 2nd Armoured Brigade was diverted north-west to an area south of the Gap between Gebel Melab and Gebel Tebag, forty miles on.
The march resumed at 1530, the terrain was described as the ‘worst for sheer difficulty of movement and frustration that they ever experienced. Jack Merewood a member of ‘C’ Squadron, The Queen’s Bays, noted later, ‘what a journey, thick heavy soft sand and the tank rolled just like a ship. Terribly dusty.’
Vehicle after vehicle got stuck in the soft sand, as many as twelve lorries were bogged to the axles. The Regiment halted for an evening meal at 1830 and when it moved on it was in two columns for six miles, until darkness fell, at which time it halted again to wait for the moon to rise. The moon rose at 2045, and the march restarted.
The Regiment set up a leaguer at 0130 on 25 March, seven miles south of Bir Soltane, and had travelled 43 miles in thirteen hours since Foum Tatahouine. At 0430 the ‘B’ Echelon arrived. At day light, with a further 30 miles to go, the attack was postponed for twenty four hours. In the afternoon the forming up area was reached and the Regiment was conducted into it’s night location after a further six hours march.
The Regimental Groups reformed on the 26 March at 0630, with ‘A’ Battery 11 Royal Horse Artillery (H.A.C.), ‘A’ Squadron The Yorkshire Dragoons and a detachment of Royal Engineers under command. There were thirty nine tanks in the Regiment;
21 Mark II Shermans in ‘B’ and ‘C’ Squadrons, 10 Mark III Crusaders and 8 Mark II and close support crusaders making up ‘A’ Squadron and Regimental Headquarters.
At 0730 the Regiment received orders, which were distributed to the squadron leaders at 0900. The initial attack was to be led by the New Zealand Corps with 8th Armoured Brigade leading at 1600 to a depth of 4,000 yards. 1st Armoured were to pass through and advance to the El Hamma area. The 2nd Armoured Brigade were to then capture El Hamma, their first objective being the ‘penetration of enemy lines to a depth of six miles from the starting position before dark, then wait until moon rise and go on to capture El Hama ten miles on.
The Birgade formed up astride the center line of the 1st Armoured Division, three miles north of the leaguer with the Bays to the left and the 9th Lancers on the right at 1430 on 26 March. At 1500, the Bays moved up to the New Zealand start line south of the Roman Wall. The Desert Air Force had already started their bombardment, X Corps artillery added to this starting their barrage at 1600 as the 8th Armoured Brigade and New Zealand infantry moved forward. The 2nd Armoured Brigade followed close behind with the El Hamma Road dividing it, at 1630 they passed the Roman Wall.
The Regiment came under ant-tank fire from the left, then approximately six tanks and some infantry attacked from the same direction. There were many burning tanks of the 8th Armoured Brigade, and as the Regiment moved on the anti-tank fire intensified.
The leading Regiments were ordered to speed up their advance, so they pushed on, but by last light the objective had not been reached. The 9th Lancers on the right were a little behind because of anti-tank fire which was also enfilading the leading squadron of the Bays. Light decreased sufficiently to reduce the efficacy of the anti-tank crews to draw an accurate bead, Lieutenant- Colonel A H Barclay ordered the advance to continue. The Squadrons were in and out of the Wadis and managed to get into the middle of the enemy gun line causing much confusion, many of the German gun crew surrendering at once. Jack Merewood remembers they ‘pushed on, right into the middle of the enemy encampment where there was confusion. Vehicles were running about not knowing which way to turn, some even coming towards us. We fired at everything in sight. We sent up more vehicles and tanks in flames and completely overran an antitank position. The crew ran past us to give themselves up. Tracer bullets raced across the sky. It was fierce, intense, yet, in the moonlight an eerie experience that left one with a feeling impossible to describe.’
By 1930 the Bays reached the ‘Forward Staging Area’ which was the objective of the first phase of the attack. The 9th Lancers arrived twenty minutes later, both Regiments paused until moonrise which was at about 2230. At 0000 the signal “RINGWOOD” was received, the order to advance on El Hamma.
There was a haze which prevented clear moonlight when the Bays and 9th Lancers set off at 2½ m.i.h. (miles in the hour). Disorganised groups of the enemy were all along the road, and the machine guns were ‘used to great effect.’ Every half mile or so the advance encountered Wadi’s which had to be crossed in single line ahead and then the tanks would fan out after crossing.
At 0430 on the 27 March orders were received to stop the advance and at dawn El Hamma was in sight. The advance had taken the 2nd Armoured Brigade through the 21 Panzer Division which was now trapped between the armour and the New Zealand Corps. The Bays had lost two Shermans destroyed with two more damaged tracks and one Crusader stuck in a Wadi. There were no personnel casualties.
Sergeant L W Smith, was the commander of the Crusader;
“During the night advance, while crossing a piece of rough country, my tank fell into a ditch, which proved subsequently to be a tank trap. A track was torn off. I remained with my tank.
“About 7 a.m. an anti-tank gunner officer came up to me and said, ‘ Enemy tanks are approaching, can’t you do something about it ? ‘
” ‘No,’ I said, ‘owing to the angle of’ the tank. I cannot cock the gun up above the bank.’
” ‘What are you going to do ?
” ‘Stay with my tank.’
” ‘O.K.,’ he said and went off.
” ‘I saw the tanks coming straight at me ; the crews were shouting and singing ; they were all drunk. 1 popped into a slit trench with my crew twenty yards away. One of the tanks came straight on and stopped short of’ the ditch. He traversed right and fired twice and then left and fired twice and two A.P. shots hit the top of my trench.
“I never thought that I’d be pleased to have A.P. shots landing near my head, but I was then.
“The tank retreated five hundred yards.
“I suddenly saw one of the ‘ B’ Squadron men trying to put out a fire in the back locker. Lance-Corporal Bradley jumped on to the tank, seized a fire extinguisher, opened the locker and put out the fire. The enemy tanks theft went off.
“A quarter of an hour later an Itai officer walked up to me, very smartly dressed, and spoke English :
” ‘Are you my prisoners or am I yours ?’
” ‘You’re mine.’
” ‘Oh, has Gabes fallen ?’
” ‘Yes, twelve hours ago.’
” ‘In which case,’ he said, come with me and collect your prisoners. There is also an 88 mm. I will show you.’
“I went with him round the bend in the wadi and there they were-14 officers, 38 other ranks and an 88 mm. in perfect order. A gunner O.P. then came up in a Honey and marched them off down the road.”
The Bays and Lancers were ordered to continue the advance at 0700. They immediately came under fire from a screen of ’88’s and Infantry belonging to the 164 German Division which with the 15 Panzer Division, had been moved back from the Mareth Line to protect the escape routes.
The enemy guns were engaged by ‘B’ and ‘C’ squadrons, the strong opposition, bad weather, and dust storms halted the tanks. Jack Merewood wrote later:
Between us and the village were trees and dense undergrowth. We trundled slowly and cautiously forward, our troop and No. 3 Troop in the lead. One of their tanks, commanded by Corporal Jim Nolan, was to our left and slightly ahead; I could see it through my periscope.
Then the quiet was suddenly shattered by a terrific bang. Anti-tank guns hidden in the trees ahead opened fire. I saw Jim’s tank hit and it immediately burst into flames.
Corporal George James (Jim) Nolan and his crew baled out, he and his turret crew, according to Jack Merewood, were all “on fire. They ran about screaming … and all died. The other two crew members never got out of the tank.’ Here Jack was wrong, understandably as the driver and co-drivers of tanks invariably did not escape from burning tanks. Somehow Trooper Ranson got out of the tank and was the only survivor of the crew.
Ranson’s fellow crew members died and were buried in North Africa; Corporal George James (Jim) Nolan, Trooper Maurice Newton and Trooper Reginald Smith are all buried at the SFAX WAR CEMETARY, Nolan and Newton beside each other. The fourth crew member, Trooper Reginald Frederick Bratby is memorialized on the MEDJEZ-EL-BAB MEMORIAL.
Jack Merewood’s tank was also damaged;
I found myself covered with blood, but it wasn’t mine, it was Nobby’s. He’d been hit on the head and he dropped straight down into the turret behind me. Our wireless operator lay on his back on the floor in a state of terror, beating the floor with his fists and his heels. Colin, our driver, shouted over the intercom, ‘My periscope’s shattered, I can’t see where I’m going.’
Without stopping to think, I jumped up, took Nobby’s seat and, half out of the tank, saw we were still heading straight for the trees. Shells were flying everywhere. Any minute I expected we’d be hit again.
‘Jink, Colin, jink,’ I shouted.
Colin zigzagged but we were still going forward. I yelled at him: ‘Pull on your right stick as hard as you can.’
He did as I said, and we made a complete U-turn. ‘Put your foot down. Let her go.’
Colin kept his head, did as I directed and we kept going until it was safe to stop. We were all very shaken. Nobby had a bad cut on the head. We saw a Red Cross vehicle not far away and handed him over to the people there, then turned to assess the damage to the tank.
The shell that had shattered Colin’s periscope had hit us on the track. Part of it was sheared in half, the pins broken at one side and just holding the track together at the other. We were amazed that after the jinking and U-turn the track had still held. If it had broken we wouldn’t have lived to tell the tale.
In total four Shermans were hit and lost. The Bays withdrew to a position overlooking El Hamma by the Tomb of Sidi Abd En Nomi. The Regimental diary states two other-ranks were killed, these are recorded in the Regimental History as Corporal Nolan and Lance Corporal Evans, with four other ranks wounded.
At 1800 the Bays moved back approximately one mile, a rum issue was approved and issued.
References:
-
Beddington, Major General W. R. A History of the Queen’s Bays (The 2nd Dragoon Guards) 1929-1945, 1954, Warren & Son
- Merewood, Jack To War with the Bays: Tank Gunner Remembers, 1939-1945, 1996, 1st The Queen’s Dragoon Guards

Excelllent post.
Where did you find the above Battle Order showing the Troopers Squadrons ? I am researching my Grandfather.
Grant, I have copies of the Regimental War Diary for the period 1942-46. I would be happy to look for anything on your grandfather. Mark
Many Thanks. I have got copies for 9/41 to 1/42 on the way. I wasn’t expecting such info to be listed. My Grandfather shipped out with Bays but was captured in the Crusader Battles in Jan 42.
I have actually only found two such tables in the copies I have, for Mareth and for the charge on Ceriano Ridge in 1944. Good luck with your research, and if there is anything I can do to help please let me know. (I also have a copy of the Regimental History and, if you don’t have a copy, am willing to scan pages).
I don’t have the Regimental History so will keep your kind offer in mind. Thank you
My grandfather Walter John Creswell was with the bays before and during the war, at the beginning of the war he was a Lance Corporal and we think he was promoted the Sergeant. He was also known as Jack and the surname was sometimes mispelt to Cresswell. I don’t suppose he was mentioned in the war diary you have?
Suzanne,
I shall have a look and get back to you.
Hi great detail and very cool to find out the names of my grandfather’s tank crew I have many photos from the period including one of you Grandfather in front of his Sherman tank with George and the others.The photo us uncensored and has unit markings etc.Also have pics of some German tanks and 88 guns they took out.
Thanks Andy. I appreciate the feedback.
I was very interested in the table which lists my father,Tpr Collins (17) in Capt Widdrington’s tank as gunner. Known as Paddy, he is referred to in Jack’s Book (bottom of Page 45) as being on guard duty and finding Jack when he got lost in the desert one night. I spoke to Jack about him before Jack died and he remembered him as ‘a very nice man’. He also featured as Major Hibbert’s gunner when his and his 2ic (Capt McVail)’s tanks got separated from the rest of the squadron in the battles of Coriano Ridge. They had to abandon their tanks after being shot up and escape and evade before trying to break out. My father was among those captured on 6th September but could be considered luckier than the 5 who escaped, two of whom died at San Martino in Venti within a fortnight. Capt McVail who was killed then along with Tpr Hancock, wrote up the adventure which is appendix C in the regimental history.
Thanks John, I appreciate the contact and comment.
Interesting to find this material. My father was Tpr Collins (17) listed above as Capt Widdrington’s gunner. He was later Major Hibbert’s Gunner. He had served in the Royal Tank Corps (6RTC) before the war for 7 years, including Palestine, and was recalled to the colours in 1939. Alfred, or Alf, was known generally as Paddy (because he was Irish!) and is referred to on Page 45 of Jack Merewood’s book, when, on guard in the desert, Jack stumbled upon him while he was lost. I did speak to Jack before he died and he remembered my father as ‘A nice man’. Paddy was with Major Hibbert and Capt McVail when they had to bail out of their tanks after being shot up behind enemy lines. They story of their escape and evasion is told at Appendix C to the Regimental History. On 6th September 1944 my father was among those of the two tanks crews who did not make it back to our own lines when they tried and was taken prisoner by the Germans. He ended up in Stalag VIIA in Moosberg Germany where he was not well treated, until liberated on 29 April 1945.
Just wondering any mention of my father S.S.M. Joe Paddy Graham. He is mentioned in the Bay’s History book. I served with the QDG until coming to Canada. My father is buried at Rob Roy cemetery on top of Blue Mountain Collingwood Ont Canada. A true Bay right until the end. He also served as R.S.M. of the Bay’s. Any information would be wonderful.
Steve,
I think we have been in touch previously on Forces Reunited. I shall have a look through the diaries, and will keep in touch.
Mark
Steve,
I am assuming you have Irish ancestry due to being called “Paddy”.
I have found J.S. Graham, who hailed from Ean Hin, Hollywood, Northern Ireland, service number 547513. This detail comes from a Nominal Roll from within the War Diary. (This was a targeted search, I shall be working my way through the Diaries, and will update information as I go.)
Please feel free to contact me on 1starmoureddivision.30.46@gmail.com.
Mark